January 15, 2012

West Country Apple Cake

Sunday morning sunshine is different from the sunshine of the other days of the week. It is softer and warmer and seems to linger a little longer when streaming through the window onto the kitchen table. This morning I woke before the sun and busied myself in my kitchen, peeling apples, sifting, combining, and stirring. After I had placed my cake in the oven, I watched the sunrise as I walked to the corner store to get the Sunday paper. The cold chill of wintery air forced me to pull my scarf up around my ears and shove my hands deep in my pockets. When I returned, my warm little house was filled with the aroma of baking apples and spices, and the sun was shining at low angles through my windows. It was lovely.

Make some country apple cake, have a good cup of coffee, do the Sunday crossword puzzle, and enjoy the sunshine. It is days like this that make life good, isn't it?


Ingredients
  • 2 cups all-purpose flour
  • 1 tsp baking powder
  • 1/2 cup cold butter, cut into small cubes
  • 3/4 cup packed brown sugar
  • 1 egg, lightly beaten
  • 1/2 cup milk
  • 3 large apples (use an heirloom variety if you can find them)
  • 2 tsp lemon juice
  • 1/3 cup raisins
  • 1/2 tsp cinnamon
  • scant 1/4 tsp each ground allspice, cloves, nutmeg
  • 1 tsp cornstarch

Method
  1. Lightly grease an 8" round cake pan. Set aside. Preheat the oven to 350F.
  2. Peel and core the apples. Slice into wedges that are about 1/2" thick.
  3. Sprinkle the apples with the lemon juice; stir to coat the apples.
  4. Add to the apples the raisins, cinnamon, allspice, cloves, nutmeg, and cornstarch. Stir. Set aside.
  5. In a small mixing bowl combine the flour and baking powder. Using a pastry cutter, cut the butter cubes into the flour until the mixture resembles coarse meal.
  6. Stir the brown sugar into the flour mixture.
  7. Add the egg and milk to the flour mixture and stir to make a sticky dough. There may be small lumps of butter in the dough, but that is ok. The texture of the dough should be like a veryyy soft, lumpy cookie dough; not like a smooth cake batter. Divide the dough into two equal parts.
  8. Spread half of the dough evenly in the bottom of the cake pan. Cover this bottom layer of dough with the apple mixture. Use the remaining dough to cover the top of the apples. It is ok if there are apples peeking through the top layer of dough. It is often prettier if it isn't perfect!
  9. Place cake in preheated oven. Bake for 55 minutes, or until tester inserted in the center comes out clean.

Serve warm with whipped cream.

Om nom nom!! :)

5:00

January 11, 2012

French onion soup

When I cook, I am rarely thinking about only the ingredients in front of me. Rather, I contemplate who might have made this recipe before me and where its origins lie. Onion soup, like most soups, is peasant food born in the countryside; the food of the poor. Onions have always been inexpensive and easy to grow. This soup is the epitome of simple, country food that could have been easily prepared on a hob in front of a fire. As I slice and stir, I think about all of the women before me who have filled their modest homes with the aroma of sauteing onions, and fed their smiling families bowls full of tasty homemade goodness.

This is what good food is.


Ingredients
  • 5 cups of thinly sliced onions
  • 1/4 cup butter
  • 1 clove garlic, finely minced
  • 1 tsp sugar
  • 1/2 tsp salt
  • 1/2 cup brandy
  • 42 ounces of beef broth
  • 2 bay leaves
  • 1/2 tsp thyme
  • pinch of pepper
  • salt to taste
  • 8 ounces grated comte or gruyere cheese
  • 6 slices of french bread, sliced on the diagonal

Method
  1. Melt the butter over medium heat; add the garlic and sliced onions and saute until they are transparent and tender.
  2. Lower the heat to medium-low and add the sugar and 1/2 teaspoon salt to the onions; continue sauteing until the onions caramelise (turn a deep golden colour), which may take up to 30 minutes. Having a thick, caramely bit of sludge form in spots on the bottom of the pan is desirable. When it happens, scrape it off and stir it into the onions, then let it form again. Repeat a few times.
  3. After the onions caramelise, add the brandy to deglaze the pan.
  4. Add the beef broth, bay leaves, thyme, and pepper. Bring to a boil, then gently simmer for 30 minutes. Season with salt to taste.
  5. Place the soup in serving size oven-safe bowls. Top each with a slice of bread, then cover the bread with the grated cheese
  6. Place the bowls under the broiler for approximately 3 minutes, or until the cheese has melted and begins to turn golden in spots.
  7. Serve while cheese is hot and bubbly.

This soup has a strong enough flavour to stand up to a nice beer. I enjoyed it with a South Shore Brewery Nut Brown Ale. It was perfect...and I imagine a few hundred years ago, it was likely the beverage consumed along side this meal.

Nom nom nom!

5:00

January 9, 2012

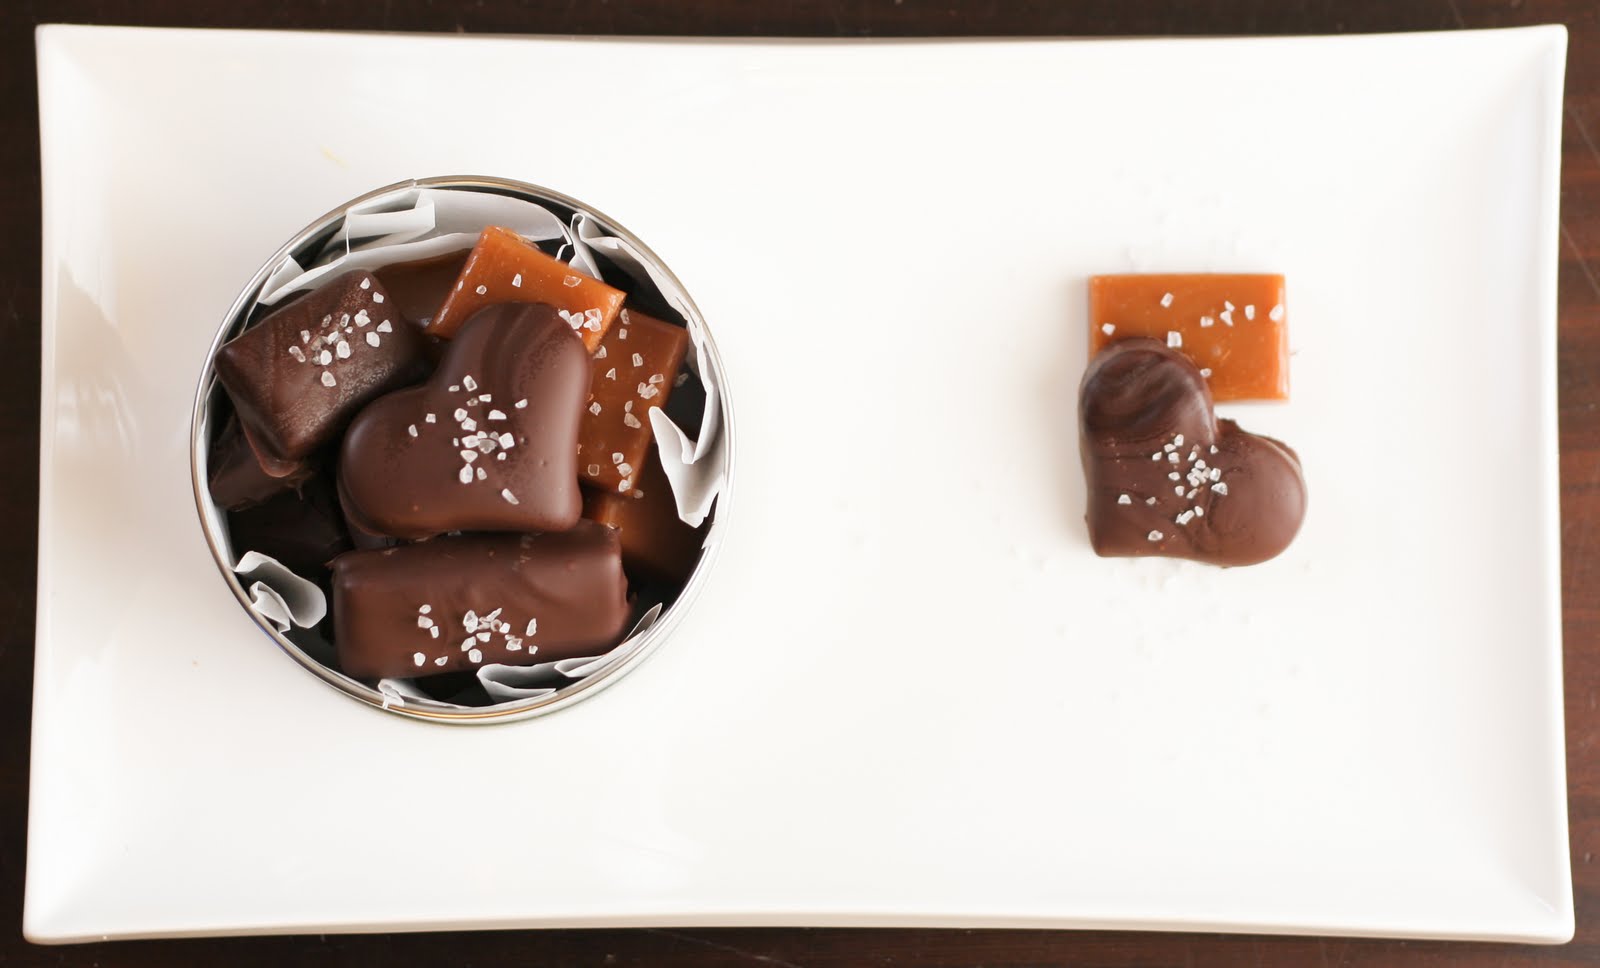
Sea salt caramels

Every Valentine's Day, I give something homemade to my husband. It is never terribly expensive, and never over the top; just something that says, "I was thinking about you". In years past, I have made brownies, painted a coffee mug, and made cards - some of which looked like they were made by a three year old as knowing when to put the craft glue down is not one of my strengths. So this year there will be no card; instead, I am making sea salt caramels.

Making your own candy always elicits praise and adoration disproportionate to the effort you put into it, and that's not a bad thing. So whip up these delicious, chewy caramels, give them to the one you love, and bask in adoration reserved for candy making gods or godesses.


Ingredients
  • 1 1/2 cup heavy cream
  • 6 tbsp butter
  • 1 1/2 tsp sea salt
  • 2 1/4 cups sugar
  • 3/8 cup corn syrup
  • 3/8 cup water
  • 3/4 cup dark chocolate chips
  • 1 heaping tsp butter
  • sea salt for sprinkling on top of caramels

Method
  1. Line an 8x8" pan with parchment paper. Set aside.
  2. In a small saucepan, combine cream, butter, and 1 1/2 teaspoons sea salt. Heat over medium heat, stirring constantly until just barely boiling. Remove from heat and set aside.
  3. In a large saucepan (3-4 quart, tall sides), combine sugar, corn syrup, and water. Heat until boiling, stirring often.
  4. Continue boiling the sugar mixture without stirring; instead, occasionaly lift and swirl the pot. Boil until the sugar mixture is caramel colour. Be sure to constantly watch the pot as once the syrup begins changing colour, it changes quickly and you do not want it to get too dark as it will taste burnt.
  5. When the sugar mixture is a nice caramel colour, pour the cream mixture into the sugar mixture while stirring constantly. Use caution as the caramel will foam up.
  6. Continue boiling the caramel until it reaches precisely 250f. The second it reaches 250f, remove the pan from heat. This is important as a couple of degrees when candy making means the difference between crunchy caramel and nice chewy caramel.
  7. Pour the caramel into the prepared pan.
  8. After the caramel has been allowed to fully cool, remove it from the pan and cut into pieces. (I used a small heart shaped cookie cutter)
  9. In a microwave safe bowl, combine chocolate chips and 1 heaping teaspoon of butter. Microwave on high 15 seconds at a time, stirring after each cycle, until the chocolate is melted.
  10. Dip the caramel pieces in the melted chocolate. Place on a parchment lined cookie sheet to allow the chocolate to set.
  11. After approximately 20 minutes, when the chocolate has begun to set, sprinkle one of the chocolate covered caramels with a few grains of sea salt. If the salt turns transparent, let the chocolate set a bit longer. You want the salt to stick to the chocolate, but not dissolve in the chocolate. When the salt sticks, but does not dissolve, continue sprinkling all of the caramels
  12. Wrap each caramel in a square of wax paper.

Tip: For $2.99 I bought a small, stainless steel box at Michael's craft store, which I then lined with parchment paper. You could also use rafia to attach a gift tag and to tie the tin as you would with a ribbon.
Enjoy! :D

January 6, 2012

Cranberry Chutney and Baked Brie

The invisible wind violently shakes the windows in their frames, and the trees, with each scrape of their bending bows, threaten to peel off the roof. I scurry about my little home, preheating the oven to bake the brie, zesting an orange and toasting walnuts to make a meal of savory goodness. It is a good night to stay in.
On nights like tonight, when the world seems inky black and foreboding, I imagine that all of the little mice of the world are hiding in their warm little dens, and owls are snuggled together in their tree stumps, and people are at home in front of their fires, sipping good wine, and eating brie with chutney.

Cranberry Chutney
Ingredients:
  • 1/4 cup finely chopped onion
  • 1 tsp butter
  • 1 1/2 cups fresh cranberries
  • 1/3 cup chopped toasted walnuts
  • zest of 1/2 of a large naval orange
  • juice of 1 large naval orange
  • 1/3 cup cider vinegar
  • 1/3 cup sugar
  • 1/8 tsp ground cinnamon
  • 1/8 tsp fennel
  • 1/8 tsp allspice
  • pinch of celery seeds
  • pinch of salt

Method:
  1. In a small sauce pan melt the butter then saute the onion until transparent.
  2. Add all other ingredients to the sauce pan and bring to a gentle boil over medium heat. Simmer until cranberries burst and a jam-like sauce begins to form.
  3. Serve warm with a small wheel (6 ounces) of brie that has been baked for 15 minutes in a 300f oven.

I enjoyed this with a reasonably priced and super yummy bottle of 337 cabernet sauvignon, which is a nice everyday wine, and toasted walnuts.

Om nom nom!

December 14, 2011

Rum Balls

When I was I child I spent my allowance on one of two things - bananas or rum balls. My brother and I would trudge 2 1/2 miles down to the bakery and spend far too much time, much to the annoyance of the bakery staff, with our hands on the glass of the display cases, trying to decide what we wanted. I, invariably, settled on rum balls. They taste so warm and chocolatey. We would slowly meander home, only to arrive there empty handed with chocolate covered hands and faces.

This recipe is a very common one, although I have modified it by reducing the amount of nuts and increasing the cookie crumbs, thereby making it slightly more affordable to make. Surprisingly, the modification does not at all affect flavour or texture. So, make a double batch, keep a dozen, and give a dozen to someone special for Christmas. :)

Ingredients
  • 1 Cup Finely chopped hazelnuts or pecans
  • 1 3/4 Cups Crushed Nilla wafers or arrowroot cookies
  • 1/2 Cup powdered sugar (aka: icing sugar)
  • 2 Tbsp cocoa powder
  • 2 Tbsp Light corn syrup
  • 1/4 Cup Dark rum
  • 4 Ounces Dark chocolate
  • 1 Tsp butter
Method
  1. Combine first four ingredients in a medium mixing bowl.

  2. Place the corn syrup in a microwave-safe bowl; microwave on high for ~15 seconds to warm and make easier to incorporate into the dry ingredients.

  3. Stir the warm corn syrup into the dry ingredients.

  4. Add the rum to the mixture; stir well. The mixture should be thoroughly moist so that it will stick together in balls, but not so wet that it won't hold the shape of a ball. If the mixture is too dry and crumbly, add another teaspoon of rum; stir.

  5. Refrigerate mixture for ~1 hour.

  6. Form into balls appoximately 1 1/4 inches in diameter.

  7. Place the dark chocolate and butter in a microwave-safe bowl; heat on high for 15 seconds; stir. Repeat until the chocolate and butter are melted.

  8. Dip each rum ball into the melted chocolate to coat. Place the rum balls on a parchment covered cookie sheet. Garnish each with a bit of chopped nuts.

  9. Allow the chocolate coating to set for at least 1 hour before serving.

Enjoy! :D